Introduction
Developers frequently use batch computing to access significant amounts of processing power. You may perform batch computing workloads in the AWS Cloud with the aid of AWS Batch , a fully managed service provided by AWS. It is a powerful solution that can plan, schedule, and execute containerized batch or machine learning workloads across the entire spectrum of AWS compute capabilities, including Amazon ECS, Amazon EKS, AWS Fargate, and Spot or On-Demand Instances. Unlike conventional batch computing tools, AWS Batch removes the undifferentiated heavy lifting of configuring and administering the necessary infrastructure, allowing you to concentrate on analyzing results and resolving issues.
The Challenge
Recently, we had to extract a large amount of data for reporting needs from a MySQL database on AWS RDS. The following limitations apply to the client’s particular business case, which we had to follow:
- Data must be extracted daily.
- Extracted data must be uploaded to S3 Storage in a CSV format.
- CSV file must be exported to an external File storage accessible via SFTP.
The first solution that comes to mind when approaching such a problem is:
- Write a script that could perform all the business logic.
- Execute if from a server that has access to the database.
- Schedule it via a CRON Job.
But introducing such a solution comes packaged with concerns:
Do we need a dedicated server where this script can reside?
How do you maintain and deploy such a script?
How can we observe the outputs and the logging of such scripts? How can we be notified about failures?
Where do we store the database credentials for the script to access?
Etc.
Maintenance of such solutions is a difficult task, which usually requires accompanying the code with extensive documentation and run-books to ensure correct deployment and enable troubleshooting.
The Solution
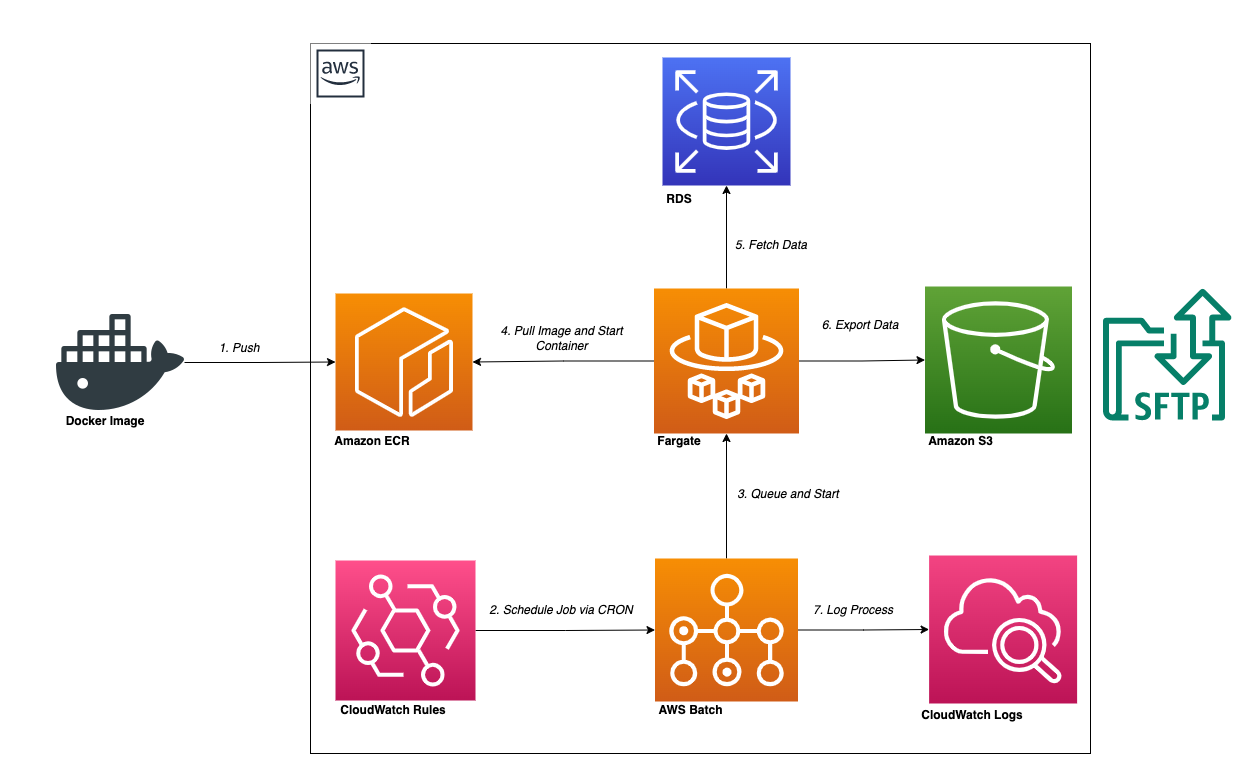
Considering performance, a shell-based script is the fastest way to extract data from a MySQL database, which is closest to the database. But keeping a dedicated server running for this task made no sense in terms of cost and sustainability. This is where AWS Batch comes into the picture, as it grants us access to fully managed processing power on demand. By allowing us to run a containerized application that can be scheduled via the use of a CloudWatch Rule, we were able to come up with a quick and easy solution using AWS Batch. We further utilized AWS CDK with TypeScript to provision the surrounding infrastructure.
The following steps display how this was achieved (the snippets have been shortened for the sake of keeping this post short). Preparation of the script that performs the following business logic:
It fetches information from its environment. This includes the database secrets, the location for file SFTP, etc.
It fetches the SSH key necessary for SFTP export, which is placed in an S3 Bucket.
It extracts the data from the MySQL database and creates a CSV file.
It uploads the data via SFTP command.
Business Logic Script
#!/bin/bash

# Retreive the Environment Variables and Secrets
user=$(echo "${DB_SECRET}" | jq -r '."username"')
password=$(echo "${DB_SECRET}" | jq -r '."password"')
host=$(echo "${DB_SECRET}" | jq -r '."host"')
dbName="${DB_NAME}"
publishers="${PUBLISHERS}"
sftpuser="${SFTP_USER}"
sftphost="${SFTP_HOST}"
uploadDirectory="${SFTP_UPLOAD_DIR}"
publicKeyFileName="${PUBLIC_KEY_FILE}"

# Fetch the SSH Key from the AWS Bucket for SFTP
aws s3 cp "${S3_BUCKET_URL}"/"$publicKeyFileName" "$publicKeyFileName"

# Get Data Dump
MYSQL_PWD=$password mysql -h "$host" -u "$user" "$dbName" -e "select CONCAT('\"',pg.url,'\"') as url,CONCAT('\"',pv.count,'\"') as count from page_views pv left outer join pages pg on pv.page_id=pg.id left outer join publishers pb on pg.publisher_id=pb.id where pb.id='$id' and pv.date='$date';" | tr '\t' ',' > "${externalId}"_XW_PAGEVIEWS_IMPORT_"${date}".csv

# Place the generated files in S3
aws s3 cp "${externalId}"_XW_PAGEVIEWS_IMPORT_"${date}".csv "${S3_BUCKET_URL}"

# SFTP this file at the provided location
sftp -oBatchMode=no -oIdentityFile="$publicKeyFileName" -oStrictHostKeyChecking=no -b - "$sftpuser"@"$sftphost" << !
cd $uploadDirectory
put ${externalId}_XW_PAGEVIEWS_IMPORT_${date}.csv
bye
!
Preparation of a
Docker File that will define our container. It is packaged with:
Docker File
FROM public.ecr.aws/docker/library/alpine:3.14
RUN apk add --no-cache mysql-client
RUN apk add --no-cache aws-cli
RUN apk add --no-cache jq
RUN apk add --no-cache openssh-client
RUN apk add --no-cache --upgrade bash
RUN apk add --update coreutils && rm -rf /var/cache/apk/*

ADD pages_views_export.sh /usr/local/bin/pages_views_export.sh
RUN chmod 755 /usr/local/bin/pages_views_export.sh

WORKDIR /tmp

ENTRYPOINT ["/usr/local/bin/pages_views_export.sh"]
ECR repository
new ecr.Repository(this, 'link-service-batch', {
   repositoryName: “link-service-batch”
});
Push Commands for ECR
aws ecr get-login-password --region eu-central-1 | docker login --username AWS --password-stdin 018500243944.dkr.ecr.eu-central-1.amazonaws.com
docker build -t link-service-batch .
docker tag link-service-batch:latest 018500243944.dkr.ecr.eu-central-1.amazonaws.com/link-service-batch:latest
docker push 018500243944.dkr.ecr.eu-central-1.amazonaws.com/link-service-batch:latest
S3 Bucket
createBucketForExportFiles() {
   const envName = this.envName;
   this.batchExportBucket = new s3.Bucket(this, `${NAME_PREFIX}-batch-exports-${envName}`, {
       bucketName: `${NAME_PREFIX}-batch-exports-${envName}`,
       publicReadAccess: false,
       blockPublicAccess: s3.BlockPublicAccess.BLOCK_ALL
   });
}
Creation of the necessary
AWS Batch resources:
Compute Environment AWS Batch
createBatchJobEnv(backendStack: LinkServiceStack) {
   const envName = this.envName;

   // Role needed for Compute Environment to execute Containers
   const computeEnvRole = new Role(this, `${NAME_PREFIX}-batch-comp-env-role-${envName}`, {
       roleName: `${NAME_PREFIX}-batch-comp-env-role-${envName}`,
       assumedBy: new ServicePrincipal("batch.amazonaws.com"),
       managedPolicies: [iam.ManagedPolicy.fromAwsManagedPolicyName("service-role/AWSBatchServiceRole")]
   });

  // Security group for the compute instance, further configured to allow access to DB and external server to upload files
   const batchjobSecurityGroup = new ec2.SecurityGroup(this, 'SecurityGroup', {
     vpc: backendStack.vpc,
     description: 'sg for the batch job',
     allowAllOutbound: false
   });

   // Compute Resources Properties needed
   const computeResourcesProp: batch.CfnComputeEnvironment.ComputeResourcesProperty = {
       type: "FARGATE",
       maxvCpus: 1,
       subnets: [backendStack.vpc.privateSubnets[0].subnetId, backendStack.vpc.privateSubnets[1].subnetId],
       securityGroupIds: [batchjobSecurityGroup.securityGroupId]
   };

   // Actual Compute Environment with plugged in Role and properties
   this.computeEnvironment = new batch.CfnComputeEnvironment(this, `${NAME_PREFIX}-batch-compute-environment-${envName}`, {
           computeEnvironmentName: `${NAME_PREFIX}-batch-compute-environment-${envName}`,
           type: "MANAGED",
           state: "ENABLED",
           serviceRole: computeEnvRole.roleArn,
           computeResources: computeResourcesProp
       }
   );
}
Job Queue AWS Batch
createBatchJobQueue() {
   const envName = this.envName;

   // Order Property needed for Queue
   const computeEnvironmentOrderProperty: batch.CfnJobQueue.ComputeEnvironmentOrderProperty = {
       computeEnvironment: this.computeEnvironment.attrComputeEnvironmentArn,
       order: 1,
   };

   // Queue Creation with plugin of Order Property
   const computeEnvironmentOrders = [computeEnvironmentOrderProperty]
   this.jobQueue = new batch.CfnJobQueue(this, `${NAME_PREFIX}-batch-job-queue-${envName}`, {
       jobQueueName: `${NAME_PREFIX}-batch-job-queue-${envName}`,
       computeEnvironmentOrder: computeEnvironmentOrders,
       priority: 1
   });
}
The Job Definition that acts as a blueprint for when the actual job is run by providing it with information on which image to pull, what environment variables to populate, which secrets to be injected, etc. While each job must reference a job definition, many of the parameters that are specified in the job definition can be overridden at runtime:
Job Definition AWS Batch
createBatchJobDef(backendStack: LinkServiceStack) {
   const envName = this.envName;

   // ECR repository
   const repository = ecr.Repository.fromRepositoryName(this, 'link-service-batch-repository', BATCH_ECR_REPOSITORY_NAME);

   // Role for ECS
   const ecsRole = new Role(this, `${NAME_PREFIX}-batch-ecs-role-${envName}`, {
       roleName: `${NAME_PREFIX}-batch-ecs-role-${envName}`,
       assumedBy: new ServicePrincipal("ecs-tasks.amazonaws.com"),
       managedPolicies: [
           // Allow to Pull Image from ECR Repository
           iam.ManagedPolicy.fromAwsManagedPolicyName("service-role/AmazonECSTaskExecutionRolePolicy")]
   });

   // Allow to Fetch a secret value
   ecsRole.addToPrincipalPolicy(new iam.PolicyStatement({
       effect: iam.Effect.ALLOW,
       resources: [backendStack.getDatabaseSecret().secretArn],
       actions: [
           "secretsmanager:GetSecretValue"
       ]
   }))

   // Allow to get and put s3 objects
   ecsRole.addToPrincipalPolicy(new iam.PolicyStatement({
       effect: iam.Effect.ALLOW,
       resources: [this.batchExportBucket.arnForObjects("*")],
       actions: [
           "s3:PutObject",
           "s3:GetObject"
       ]
   }))

   // Create Job Definition by plugging in the container properties
   this.jobDefinition = new batch.CfnJobDefinition(this, `${NAME_PREFIX}-batch-job-definition-${envName}`, {
       jobDefinitionName: `${NAME_PREFIX}-batch-job-definition-${envName}`,
       type: "container",
       platformCapabilities: ["FARGATE"],
       containerProperties: {
           image: ecs.ContainerImage.fromEcrRepository(repository).imageName,
           jobRoleArn: ecsRole.roleArn,
           executionRoleArn: ecsRole.roleArn,
           environment: [
               {
                   name: "PROPERTY_NAME",
                   value: "PROPERTY_VALUE"
               }
           ],
           resourceRequirements: [
               {
                   value: "1",
                   type: "VCPU"
               },
               {
                   value: "2048",
                   type: "MEMORY"
               }
           ],
           secrets: [
               {
                   name: "DB_SECRET",
                   valueFrom: backendStack.getDatabaseSecret().secretArn
               }
           ],
           fargatePlatformConfiguration: {
               "platformVersion": "LATEST"
           },
           // NOTE : This should send logs automatically to Cloud Watch
           logConfiguration: {
               logDriver: "awslogs"
           }
       }
   });
}
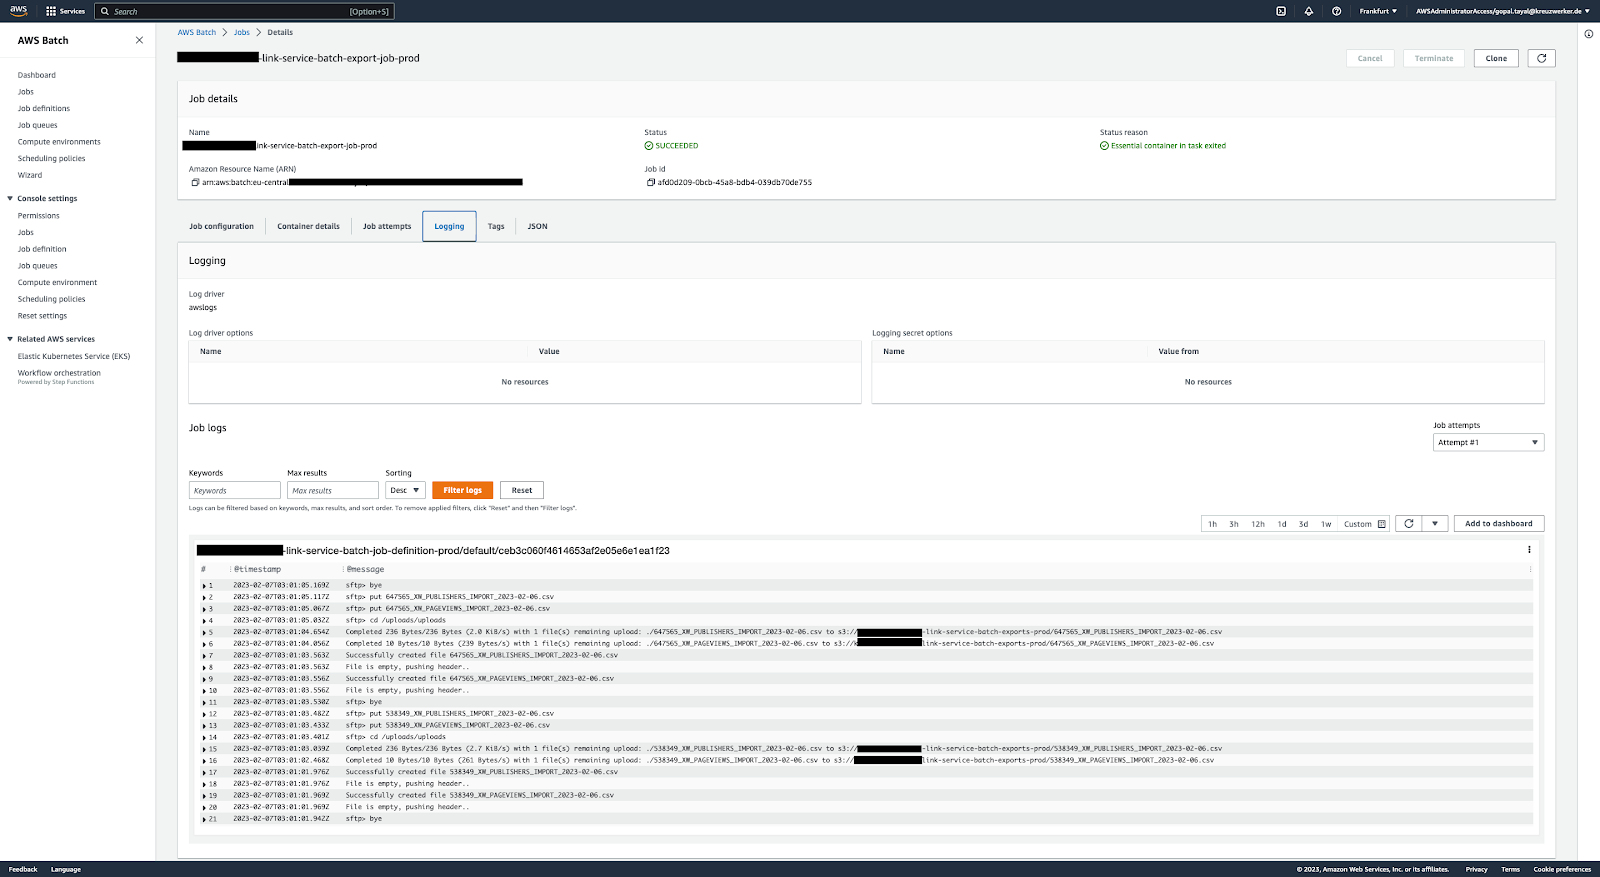
Once this initial setup is complete, the functionality can be tested by manually submitting a job that uses the batch job definition defined above (it integrates with CloudWatch automatically to provide you with logging from inside the container):
Cloud Watch Rule
createScheduledRule() {
   const envName = this.envName;
   // NOTE : Ideally this will create a new Role on its own to submit a batch job.
   const exportScheduleRule = new events.Rule(this, `${NAME_PREFIX}-batch-rule-${envName}`, {
       ruleName: `${NAME_PREFIX}-batch-rule-${envName}`,
       description: "This Rule Schedules the submission of Batch Jobs",
       schedule: events.Schedule.cron({minute: "0", hour: "3"}),
   })
   // Add the Batch Job Definition and Queue as the target for the Rule
   exportScheduleRule.addTarget(new event_targets.BatchJob(
       this.jobQueue.attrJobQueueArn,
       this.jobQueue,
       this.jobDefinition.parameters.arn,
       this.jobDefinition,
       {
           jobName: `${NAME_PREFIX}-batch-export-job-${envName}`
       },
   ));
}
And that’s it! The Job will be automatically invoked by CloudWatch rules based on the CRON expression that we have configured.
Summary
In this post, I detailed the steps to create and run a simple “Fetch & Run” job in AWS Batch with code snippets. I have only highlighted the core concepts here, but in a production grade project we can:
- Maintain changes to the script via version control.
- Define CI/CD pipelines via CDK and CodePipeline.
- Setup hooks to auto deploy new versions of the script and batch resources upon any changes via the pipeline.
Congratulations, you made it till the end! Hopefully this post gave you some pointers on how to successfully use AWS Batch for automating your tasks in the AWS environment. If you found this article useful, do share it with your friends. If you have more solutions that can be applied for this use case from the AWS ecosystem, let me know. I’d be happy to learn more about it.
Thanks for reading!
, a fully managed service provided by AWS. It is a powerful solution that can plan, schedule, and execute containerized batch or machine learning workloads across the entire spectrum of AWS compute capabilities, including Amazon ECS, Amazon EKS, AWS Fargate, and Spot or On-Demand Instances. Unlike conventional batch computing tools, AWS Batch removes the undifferentiated heavy lifting of configuring and administering the necessary infrastructure, allowing you to concentrate on analyzing results and resolving issues.

